After three months in our new home we finally found enough energy to hang pictures.
Our “Boommate” will be moving in with us in a couple of months and we needed to get the pictures out of her space downstairs where they are all stacked against a wall. Our new home is bigger than our old home, but has less wall space for picture display since there are many more windows. Part of the hanging process involved deciding which ones we will continue to store in the furnace room. Husband decided he didn’t want any of his old family pictures hung. That made things a lot easier, as some of them are pretty big.
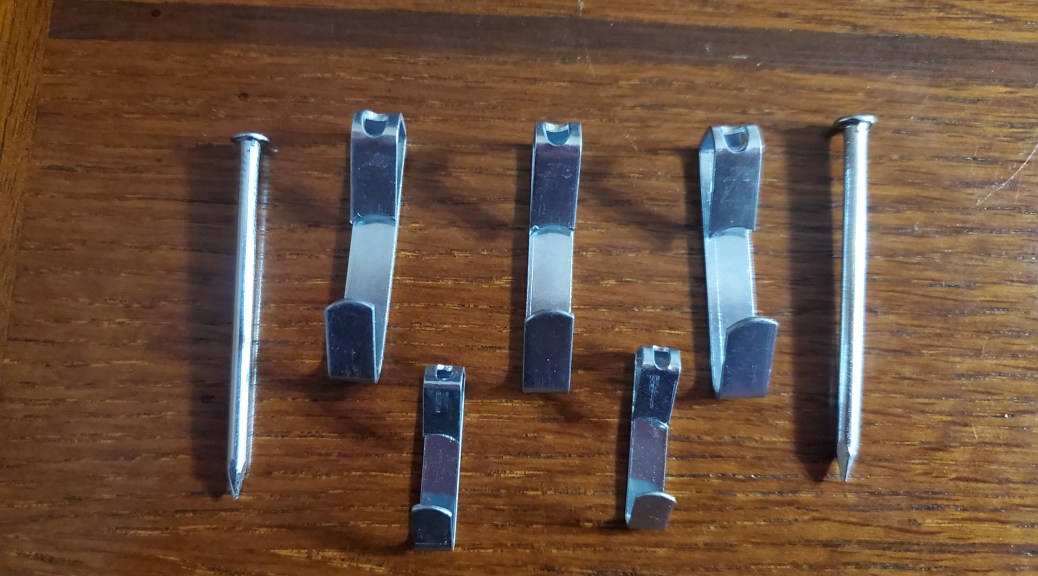
For some reason I make Husband anxious by my picture hanging method, which involves careful measuring and centering. He worries that the pictures will fall off the walls because the nails and/or fasteners will rip out of the drywall, and wondered why we didn’t secure them in the wall studs. I explained that the hangers pictured in the header photo are very secure and that none of our pictures is so heavy as to require securing in a stud. I think he believes me, but still is anxious about the whole process.
In a tribute to our famous local photographer Jim Brandenburg, we hung all his nature photos in the dining room A large John Coltrane poster graces the area with the piano and Husband’s guitar and cello. The house is really feeling like home.
What are your picture hanging methods? What makes your abode feel like home?
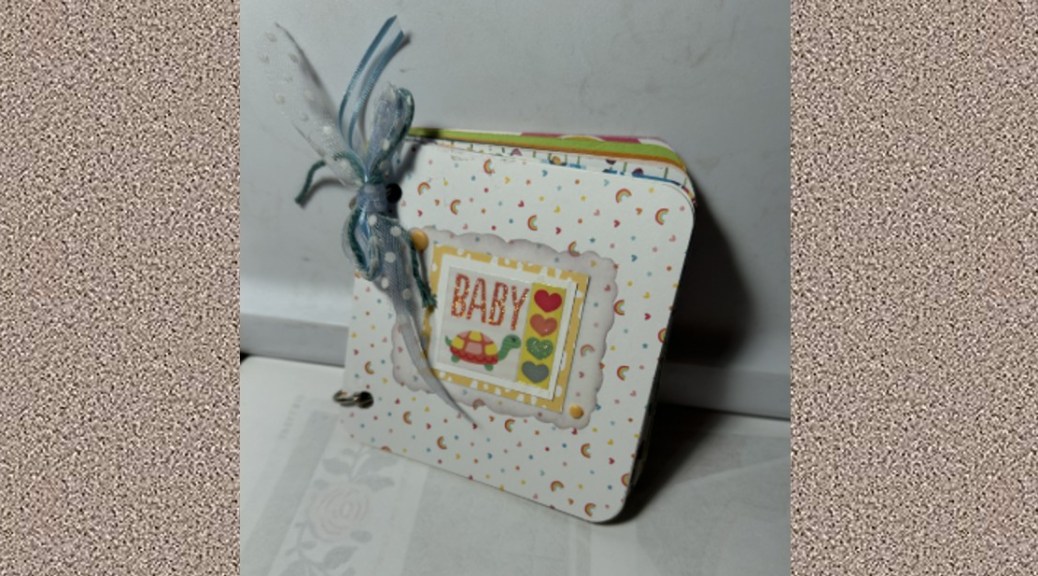
We have a new baby in the neighborhood; they came home on Saturday. These are newish neighbors so I don’t know them super-well. With folks you don’t know, and young to boot, it’s hard to gauge what kind of gift to get. I wasn’t invited to any showers and these days new parents seem to want the types of stuff that I either have never heard of or is out of my price range. I need a small, casual gift. My go-to is the chunk journal.
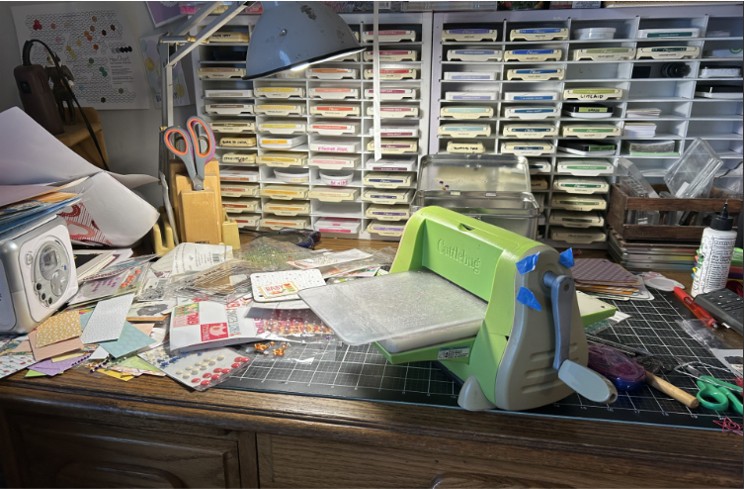
This is a small photo album, just 4 x 4, with lots of pretty paper and embellishments. The front and back cover is made with corkboard – I get the 4 x 4 coasters online. It’s easy to make and I get to use up stuff from my way-too-big craft stash. Papers, ribbons, stickers, bling. The only problem with the chunk journal is the mess:
I don’t have a plan when I start a chunk journal except the number of pages (I usually do 24 pieces, so places for 48 photos. As I cut paper and take out various embellishments, I don’t put them back right away, as I may want to use them again on later pages. This means my desk is covered in all kinds of stuff that I’m not willing to return to its home until I’m all done with the journal. As I get closer and closer to the end, I get a little more ruffled about the mess. I start to put stuff away in my head. That means I get two endorphin kicks at the end. I’ve finished the gift and I get to start the clean-up. Unfortunately, this is the only time I get all excited about cleaning up in my studio. Rats.
Do you have any go-to gifts (any occasion)? Do you purchase gifts off folks’ registries?
I saw the sad news that Diane Ladd passed away yesterday – she was 89.
She began acting at the age of 18 and just retired 3 years ago; her last roles were in Gigi & Nate and Isle of Hope. When she first came to my attention was the year I graduated high school, when she appeared in Chinatown and then Alice Doesn’t Live Here Anymore. Both great performances and she was nominated for a Golden Globe, Academy Award and a BAFTA – winning the BAFTA.
One of my favorite of her performances was as Etta, the sister-in-law of Theresa Turner in Black Widow. It wasn’t a huge part but she really made her cool but nasty character sizzle on the screen. The header photo is the best one I can find of her in that role.
I also really liked Rambling Rose in which she plays a southern woman who battles to keep a younger teenager from going under the knife unnecessarily. Here’s a good clip from that:
I also remember a really nice part she played in a Columbo episode. She’s a wheelchair bound woman whose husband kills her mother. She wears pretty, diaphanous dresses and appears fragile, but turns out to be a strong and kind woman. It’s one of my favorite Columbo episodes.
Her part in Alice didn’t do much for me. Of course, the I didn’t care the the show BEFORE she stepped in, but trying to shoehorn her into the role that Flo had vacated didn’t seem to work all that well. But she was popular and did win a Golden Globe for her work.
Most of the news stories today have “mother of Laura Dern” in their titles. It’s a shame because I don’t think that’s her big claim to fame. She had a long, diverse and entertaining career; that’s what the headlines should be!
Have you seen Diane Ladd in anything? Do you have a favorite?
Did you ever watch a dog chasing a ball or a stick and watch them running and grabbing at it off the ground and think, doesn’t that hurt your lips scraping them across the gravel like that?
We pondered that playing with Luna the other day. It doesn’t seem to bother Luna.
Daughter came up with this Halloween costume all on her own:
Last week driving to Plainview there was a lot of corn still standing. This week a lot of corn has been harvested. Not mine, but all the corn around us. Several guys have finished. And now they’re hard into fall fertilizer and tillage. If any of you retired people want a job, I’m sure you could go to any of the larger farms in the area and get a job driving a tractor or truck for about 3 months. Depending on weather, it’s long days, lack of sleep, field meals, and, if you’re like my brother, “it’s just round and round- it’s boring!” But it’s big equipment and it can be fun. It wouldn’t work for me right now. I can’t get there until mid morning by the time I take daughter in. And I may have to leave mid-afternoon to pick her up. And I have a show this evening… Nope, I’m not the ideal candidate. YOU might be!
And the equipment sure is fun to see.
This week was all about getting the college show finished. We have our first show at 2:00 PM Saturday, the 1st. It will be ready, and ‘good enough’, but if I had more time, I’d tweak a little more.
It’s a good thing this set isn’t any bigger. I don’t know what happens to me that everything turns into a rush at the end, whether trying to get book work done to meet my accountant, or finish a set, or get the machine shed enclosed before cold weather comes, apparently I think I like the thrill of the rush of adrenaline and the whooshing sound the deadlines make as they go past.
Music lately has been some boogie woogie piano, my usual ‘All That Jazz’ movie soundtrack, and then playing a video of “The Gospel at Colonus”, from 1985. The full show is available on YouTube. I’ve had the CD for years, and we saw it at the Ordway maybe 10 years ago. This production has Morgan Freeman, Jevetta Steele, The Five Blind Boys of Alabama, and SO MUCH good gospel music. I was painting alone and singing and shouting along. HALLELUJAH! AMEN!
So. The lack of concrete. I mentioned on the blog one day that I didn’t feel good over the weekend and postponed the concrete.
Last Friday afternoon I rented a little machine called a plate compactor. It’s about the size of a small snowblower, I believe the plate measured 17“ x 20“ and its got a little Honda gas engine on it, and a long handle and when you rev it up it vibrates really fast and compacts whatever it is you’re trying to compact. In this case, about 8 inches of gravel as a sub-base for the concrete. It goes really good in one direction; pretty much drives itself. And it’s not too hard to go in circles, but if you drive it into a corner, you’re kind of stuck. The only instructions they gave me when I picked it up was how to start it. Later on I was on YouTube trying to find some instructions on running this thing, or if there was a certain amount of time you needed to compact material and the only videos I could find were how to start it. What somebody needs to make is a video that’s gonna tell you right up front, this thing’s gonna kick your ass. For the first half an hour. Because when you drive it into the corner the only way to get it back out is to use brute force and pull it back against the machine’s compaction motion. And eventually you’ll figure out you can flip the handle over and sort of steer it, almost one handed, but that doesn’t really help if you’re in a corner with a couple of walls. Anyway I learned a lot that first hour. And when I woke up Saturday morning, muscles I didn’t know I had hurt. And then my stomach started to hurt, then I got the chills, and I just didn’t feel that great. But, I had a lot of work to do.
WFriday evening I had finished compacting the sub base inside the shed, that 20′ x 20‘ area. Saturday morning I started putting gravel in. Kelly came and helped. That woman really is too good for me. She has an attention to detail that I don’t. She’ll spend hours working on something that I said was “good enough” long before. I was still feeling terrible and I finally had to go in the house and take a nap. Three hours later she was still adding a little gravel here, taking off a little there. She used those YouTube videos to learn how to start the machine and she was compacting gravel. We use one of those laser levels that sits on a tripod and puts out a green laser beam line. Then I have a stick with three marks on it: the height of the existing concrete, then a mark for the sub-base, and a mark for the Gravel.
Kelly is not afraid of hard work and she said she was enjoying it. I just wanted to move on because I’m always moving onto the next project.
Saturday night I came in the house and took a shower and then I soaked in the tub for half an hour and I went to bed.
Sunday morning we were back at it. All we had to do on Sunday was a little area 13‘ x 6‘ to be a walkway at the front door of the shop. I didn’t have much energy and if I had to get on the ground to do something, I tended to stay there for a while. Outside the shed, I cut a hole in the wall and shoved a piece of PVC pipe in for the drain, and then I laid in the dirt for a while. There was a thistle under my left shoulder. It hurt. Eventually I got up.
And by Monday, I knew I had to postpone the concrete. I needed to take that off my plate. A friend told me I don’t need a plate, I need a turkey platter. Yeah. That’s about right.
Almost ready!
Speaking of pondering, I read these two phrases in a new display at the college art gallery. :
Ouch. That seems kinda harsh.
This one reminds me of that quote: “In order to discover new lands, you must consent to lose site of the shore.”
The display is photographs by Ethan Aaro Jones, and is called “Unsearchable Distance”.
At the library last week I happened upon a little hardcover book called Pizzapedia by Dan Bransfield. It says on the inside flap that it’s a “biography of pizza”. I wouldn’t go quite that far but it is a charming piece filled with marvelous illustrations.
And some humor. I found this about ¾ of the way through, right after an illustration of a pizza-making robot and how it works:
Isaac Asimov’s Three Laws of Pizza Robotics
First Law. A pizza robot may not burn a pizza or, through inaction, allow a pizza to come to harm.
Second Law. A pizza robot must accept orders for pizzas except where such orders would conflict with the First Law.
Third Law. A pizza robot must protect its own recipes as long as such protection does not conflict with the First or Second Laws.
If you’re not a Sci/Fi fan, here is a copy of Issac Asimov’s original Law of Robotics.
A robot may not injure a human being or, through inaction, allow a human being to come to harm.
A robot must obey the orders given it by human beings except where such orders would conflict with the First Law.
A robot must protect its own existence as long as such protection does not conflict with the First or Second Law.
These laws were first introduced in Asimov’s 1942 short story “Runaround,” which is part of the collection I, Robot. They were designed to create a framework for ethical behavior in robots, ensuring that they prioritize human safety and obedience while also allowing for self-preservation.
I’m pretty sure that any pizza-making robots out in the world aren’t too worried about having to pledge allegiance to Issac Asimov, but the author made me laugh and that’s always helpful these days!
What is your favorite? Thin crust, thick-crust, stuffed crust, deep-dish? Square cut or triangles?
My tomato and pepper plants are still putting out fruit, so I am out at the bales every day harvesting. If you’ve ever grown tomatoes, you know that you can’t pick them without getting a very pungent smell all over your arms and hands.
I’m also working with melting beeswax (Ukrainian eggs). It gets on my fingers and under my fingernails.
The tomato plant smell is easily washed off (if I remember when I come in) but the beeswax smell lingers not just on my hands but on my clothing, in my hair, probably in the air. Even after a shower, I can still occasionally recognize a whiff of it. A couple of times the last few days I’ve noticed that the tomato smell and the beeswax smell are duking it out to be the top dog. The beeswax always seems to win.
I don’t mind either of these aromas. Not like patchouli. This is an odor that I just can’t abide; in close quarters it actually makes me a little nauseous. Since there are people who seem to like it, I’ve always assumed that it was some sort of biologic response, kind of like how Jacque can’t stand the taste of cilantro. I haven’t found any science to back up my theory but I’m going to stick with it for now!
I’ll be done with the eggs in a couple of days and the tomatoes are slowing down, so assuming that the war of the smells will be over soon but it’s interesting while it’s going on!
A couple of comments yesterday made me think that I have probably never explained the process of making a Ukrainian egg or “pysanky”. I’ll try to keep it simple!
Larger eggs are easier, although I did a fun series of three teeny eggs a few years ago. A rinse in white vinegar gets any residual grease off the egg. You work with a whole egg, uncooked and not emptied.
Ukrainian egg dying is a little similar to batik. You apply melted wax to the egg and then dip it in dye. You repeat this, from your lightest color to you darkest until you’re done and then melt all the wax off. A very traditional pysanky will be white, yellow, orange, green, red and black but there are plenty of other designs using other shades (blue, purple, pumpkin, brown, etc.) After you are all done with waxing and dyeing, you melt all the wax off the egg (carefully) to reveal your design in all its glory.
There are a few tools for making pysanky. The most critical is called a kistka and it is the tool that you use to melt the beeswax and to apply the wax to the egg. I have two kinds of kistkas. The traditional kistka which is held over a candle to melt the wax and an electric kistka, which keeps the wax cone hot without having to use a candle. Both traditional and electric have a variety of widths, depending on how thick or fine you want your wax lines. I tend to use both during a project. The beeswax has a black additive these days; without it, the wax is hard to see on the egg if you’re using electric – no carbon from a candle flame!
After you’ve melted off the wax, that’s when you add the varnish. This is an important step because it not only makes the egg shiny and pretty but it adds a bit of strength to the shell. If you are making pysanky that are being displayed but are not ornaments, then you are done. Eventually the insides of a Ukrainian egg will dry up and you can hear the dried yolk rattle if you shake them. (If you break one before it’s all dried up – get a clothespin for you nose!) If you are making ornaments, you’ll need to blow them out and add a finding to the top so you can thread it with twine, floss or some sort of string.
The most frequent question I get is how long an egg takes and it depends entirely on the complexity of your design. This year’s egg, if I did one at a time, from beginning to end would take about 75 minutes, but since I’m doing several at one time, that cuts down the time to about 55 minutes each.
Of course, there is plenty more I could say, but I’ll save that for when you ask me!
The egg table is up. And it only took two hours to completely torpedo this year’s design.
Many years ago I started coordinating my holiday crafts to a central theme. In addition to the Ukrainian egg ornaments, I also make the cards as well as kid ornaments and 6×6 decorated calendars. I try to tie all these items together every year. One year I did a snowglobe theme, one year the theme was “branches”. Peppermint, polar bear, gingerbread men, birds have all been done. There are a few themes that get repeated – holiday trees is one of those and also poinsettias.
This year’s theme is Santa. The card, the kid ornament and the calendar were seriously easy but the egg has been difficult. First off, there just weren’t many idea out there to start with and most that I found were painting on eggs, not traditional wax/resist. I had one idea and then when I sketched it out the first time, I realized it would be too hard to get all Santa’s proportions correct on an egg. Then I turned to clipart – a surprisingly good way to generate ideas for Ukrainian egg design. I messed with the idea for a couple of weeks and thought I had a good design.
Suffice it to say that drawing curvy lines in hot wax on an egg isn’t an easy thing to do. Then add fiddling around with mixing different dyes to get Santa’s skin right. Leaving space for his eyes was a pain. But the biggest issue was just too much white and a bit of red then a black background; it was just — blah. And I didn’t like the side border either, although that could have been remedied. I completed two of the design and then abandoned it.
I spent about an hour going through my egg design books and a couple of online places and finally found something that I could alter. There is no actual Santa on the egg, but it has a lot of red and white, with a black background and I was able to add “ho, ho, ho”; that’s as close as we’re going to get. This design is more complicated than the failed Santa image, but much more satisfying. I managed to get three done before I just couldn’t sit on my hard chair any longer – the design is solidified so now I’ll be on a roll starting this morning – after I feed the bad Santas into the garbage disposal!
Have you ever had to abandon what you had initially thought was a good idea?
Eighty-five years ago last week, four teenagers accidentally changed not only the trajectories of their lives, but history as well. While hiking near Montignac, France, the four boys stumbled upon caves with a collection of cave paintings unlike anything ever seen. The paintings, known as the Lascaux cave paintings have been dated from 15,000 to 17,000 years back and turned the art world on its ear, proving that Stone Age peoples were artists and biographers.
The four boys ended up on different paths. Two of the boys were Jewish and shortly after the discovery, one boy was sent to Buchenwald with his family and the second boy ended up being hidden by a Jewish Children’s aid organization. The other two boys, who were from Montignac, guarded the cave over the first winter and eventually became tour guides of the famous caves and paintings. In fact, it was the two of them that noticed the condensation in the caves causing algae and mold growth. It was at this point that France closed the caves to the public to protect them from as much outside environment as possible. The cave paintings have been meticulously copied and can be viewed in a replica of the caves – Lascaux IV – part of the Lascaux historical center.
The two Jewish boys survived WWII and Buchenwald; all four lived into old age and were re-united in 1986. The last to pass was Simon Coencas, who died in 2020 at the age of 93.
The paintings were obviously modern art at the time they were created, but at 15,000 years of age, I doubt they qualify any longer. I have a few pieces of modern art but I also lean toward more classical representational art. Impressionism is a favorite and I am fond of a lot of sculpture. I particularly love this one that resides here in the Minneapolis Institute of Arts:
If you could go back in time and discover something, what would it be?
As of last Sunday we had our house on the market for two months. We had many showings, but no offers.
Our real estate agent couldn’t understand why. The house was clean, well kept, and nicely updated, with lovely features. We knew that our rather wild yard with the mass of raspberry canes, the large strawberry bed, the front veggie bed, the large flower beds, and the rampaging rose bushes just didn’t appeal to some viewers. Others wanted a larger yard, something we really couldn’t do much about.
Our agent wondered if the basement, which we had extensively remodeled and updated. was just a little dark. She advised us to try ro make it brighter, so last Sunday we replaced all the basement light bulbs with Bright White LED bulbs. We did the same to the upstairs lights for good measure. The whole interior was somewhat brighter, with uniformly tinted bulbs.
The next day, Labor Day, was somewhat trying as we had two showings, and that meant keeping the house beautifully pristine and having to leave for about an hour with the dog. I don’t quite understand this, but both of the viewing parties on Monday gave us offers immediately after the showings!
Was it the lightbulbs? I seem to think it was, and I find it ridiculous. I am grateful and relieved, though. Now we can focus on wrapping things up here.
What would you look for if you were buying a new house? What decorating trends, past or present, have you loved or loathed?










 And some humor. I found this about ¾ of the way through, right after an illustration of a pizza-making robot and how it works: